
Zucchini Relish
Chuck became interested in fermentation last fall after watching a homesteading couple on You Tube share their many different fermenting recipes. For Christmas I bought him a fermentation kit which included everything he needed to get started.
His first attempt was pico de gallo which ended up being very tasty. his next batch was fermented jalapeños which easily passed the Chuck taste test with flying colors.
Fermenting foods is pretty easy and foolproof, and results in a nutritious food to include with your meals. Apparently the fermentation process allows the food to remain live, unlike food that is cooked. Usually fermented food is used more as a relish or small side added to a meal, rather than the meal itself.
Fermenting foods is pretty easy and foolproof, and results in a nutritious food to include with your meals. Apparently the fermentation process allows the food to remain live, unlike food that is cooked. Usually fermented food is used more as a relish or small side added to a meal, rather than the meal itself.
Recently we came home from a visit to our daughter’s with an armload of zucchini from their garden. As I looked for different zucchini recipes I came across one for a fermented zucchini relish, and I’m so glad I did.
If has ended up being one of our favorite foods, and we have used it in several different ways. I thought I might share with you today how we made it to encourage you to give it a try.
We began with three medium sized zucchini’s which I spiraled with my handy dandy As Seen on TV spiraler. After spiraling them I cut them into smaller sections with a knife. I just didn’t want them to be quite that long.


Next I diced a small white onion using my onion chopper. Are you beginning to see a pattern here when it comes to kitchen devices? I chopped (not minced) two cloves of garlic next.
I put all the ingredients into a large bowl, and added 1/2 teaspoon red pepper flakes, and 1/2 teaspoon mustard seed. I then added some fresh dill that I got from the grocery store. I sprinkled about 1 1/2 to 2 tablespoons of coarse salt (I’m using canning salt.) on top of the mixture.


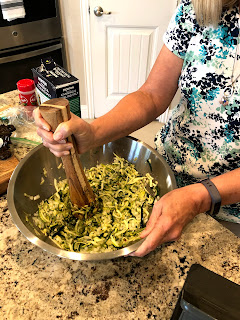
I then took a wooden packer to pound down the mixture gently until a natural brine began to form. I did this for a couple of minutes to increase the amount of liquid. Then I put this into a clean pint mason jar and placed a glass weight on top. This came with the kit, but you can use a large cabbage leaf to cover the top.
You want to make sure you leave about an inch at the top of the jar for the mixture to expand. I also have a special lid that I use that allows air to escape during the fermentation process. If you don’t have this you will need to burp your jar daily just by loosening the lid. ( Don’t actually open it because you don’t want to let air in.)


Let your mixture sit out of the sunlight for about ten days. (Don’t put it in your fridge yet, and place bowl under the jar just in case it starts to bubble up.) You can taste it about half way through, and if you like it you can then refrigerate it at that point. We found it to be too salty half way through so we left it out for a few more days.
The first thing we tried it on were hotdogs grilled on the grill. It was amazing. I added just a hint of mustard to my dog, but Chuck only added the relish. (I'll include the super easy baked beans recipe another time as seen in the photo below.)


We had it on breakfast tacos as a substitute for salsa or pico and it was really tasty. We didn’t even miss the cheese on this one.


I also used some left over potatoes and sautéed them with red onion to add to scrambled eggs. When we added the relish it took the meal to a whole other level. It’s now become a favorite of ours, and I’ve even made a batch for our daughter.


I’m including a link to the recipe, a link to a fermentation kit, and a link to the You Tube Channel Off Grid With Doug and Stacy below to help you get started.
No comments:
Post a Comment